


Starting seeds for hydroponics doesn’t have to be complicated. After trying several different methods, I’ve found that Rapid Rooter plugs from General Hydroponics consistently offer the best results. They’re simple to use, have excellent germination rates, and work with just about any hydroponic system.
In this guide, I’ll walk you through exactly how to use Rapid Rooter plugs to kickstart your hydroponic garden.
What Are Rapid Rooter Plugs Made Of?
Rapid Rooter plugs are starter plugs made from composted organic materials—usually a mix of peat moss or tree bark. They’re manufactured to create an ideal air-to-water ratio, which promotes fast, healthy root development.
Compared to other options like rockwool, Rapid Rooter plugs are easier to handle, don’t require pH balancing, and are more beginner-friendly.
Pro Tip: They can be used with DWC, ebb and flow, drip systems, and even soil when it comes transplanting.
Supplies Needed To Germinate Seeds Using Rapid Rooter |
||
|---|---|---|
| Rapid Rooter Plugs & Tray– The kit comes with 50 Rapid Rooter starter plugs and a tray that holds water to keep plugs moist. |  |
View Product |
| Heat mat– Many seeds have higher germination rates when the temperature is in the 70 to 80 degree range. | 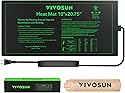 |
View Product |
Also Needed: Seeds, a bowl of water |
||
How Use Rapid Rooter To Germinate Seeds For Your Hydroponic Garden
The first thing to do is soak the Rapid Rooter plugs in distilled water. Some people soak them up to 24 hours; I typically soak them for only a few hours and have had no issues. After soaking, place the plugs into the grow tray.
1. Soak the Plugs
Start by soaking the Rapid Rooter plugs in distilled water. Some people soak them for 24 hours, but a couple of hours is usually enough. Once saturated, place the plugs back into the tray.
2. Plant Your Seeds
Drop 2–3 seeds into the center hole of each plug. Planting multiple seeds boosts the chance that at least one will sprout.
 Some seeds may germinate before others and they will be able to push off the pieces of the cube as the seedling emerges, exposing itself to light. That way other seeds that are still in the process of germinating will still be in the dark.
Pro Tip: Tear a tiny piece from the bottom of a plug and place it over the seed hole to block out light. Seeds germinate better in darkness.
3. Add Water to Tray
Pour about a 1/4 inch of water into the tray. The bottom of each plug will wick up moisture through the holes, keeping everything evenly damp.
4. Cover the Tray
Place a humidity dome over the tray to trap heat and moisture. No dome? Use plastic wrap as a DIY alternative.
Some seeds have a better germination rate when provided with some extra heat. I recommend placing a seedling heat mat underneath the tray to maintain a warmer temperature. Place the tray under a seedling light and keep an eye on moisture levels—add water as needed to keep plugs moist but not soggy.
5. Monitor Growth
Once seeds germinate, remove the dome. As your seedlings grow, they’ll need stronger light. You’ll also begin to see roots poking out of the sides and bottom of the plugs.
When Are Seedlings Ready For Transplant?
Once roots have visibly grown out of the plug and the seedling has developed a few leaves, it’s ready to move into your hydroponic system.
Rapid Rooter plugs work with:
- Net pots in DWC or NFT systems
- Grow beds in ebb and flow setups
- Media like clay pebbles, coco coir, or even soil
When transplanting seedlings in your hydroponics system, start with a diluted nutrient solution to ease your young plants into the new environment.
 | My Top Pick | 11,700+ Reviews |
🌱 Troubleshooting Germination Problems with Rapid Rooter Plugs
Even with high-quality plugs like Rapid Rooters, things don’t always go perfectly. Here are some common problems beginners run into—and how to fix them.
🧫 Problem: Mold or fuzzy growth on plugs
Cause: Too much humidity and poor airflow
Fix:
Remove the humidity dome for a few hours a day once seeds have sprouted
Increase air circulation around your tray
Try sprinkling a little cinnamon on the surface—it’s a natural antifungal
🌡️ Problem: Seeds not sprouting
Possible Causes: Old seeds, too low/high temperature, too low/high moisture, or not enough darkness
Fix:
Make sure your heat mat keeps the tray around 70–80°F
Tear off a bit of the plug to cover the seed hole (seeds need darkness)
Always start with fresh, viable seeds for best results
💧 Problem: Plug tops drying out too quickly
Cause: Low humidity or too much light early on
Fix:
Add a little more water to the tray—plugs should stay moist but not soggy
Ensure the tray is not near fans, drafts, or under intense grow lights
If you’re in a dry climate, try covering the tray with plastic wrap if you don’t have a dome
🌊 Problem: Seedlings grow but roots don’t develop
Cause: Overwatering, poor seed-to-plug contact, damping off
Fix:
Make sure you’re only filling the tray with about ¼ inch of water—plugs should wick, not soak
Press seeds gently into the plug so they make contact with the moist surface
Avoid flooding the tray or letting plugs sit submerged
Final Thoughts
Rapid Rooter starter plugs are my preferred method when I start seeds for my hydroponic gardens. They make the process easier, more consistent, and cleaner than other germination methods. Plus, they’re affordable and versatile.
Using Rapid Rooter plugs is one of the easiest and most effective ways to give your hydroponic garden a strong start.


June 4, 2017 at 11:57 pm
Do the seeds in the rapid rooter get light right away? 24 hours like veg stage?
June 8, 2017 at 6:52 pm
Chase,
Thanks for the question! I would recommend waiting for the seeds to sprout above the top of the rapid rooter before placing them under light.
November 28, 2017 at 2:18 am
DO you need to seal the hole above the seed or is it okay to leave it open?
November 29, 2017 at 1:42 am
Good question. Covering the hole may be necessary if you can not germinate seeds in dark place. It’s especially helpful when germinating tricky seeds where some may sprout before others. That way you can have the light on for those that are sprouting while still allowing the other seeds time to sprout.
March 18, 2018 at 12:54 am
Covering hole is fine from seed. Don’t push torn piece of cube into hole in cube where seed is. Just take large enough piece to cover hole to stop light and remove to check germination.
If cloning cuttings, I always push small piece of cube down middle to support and keep light out
April 14, 2018 at 5:47 am
hi, can I use rapid rooter to germinate my seeds, then transplant into potting soil for?
July 8, 2018 at 12:04 am
Absolutely, plants germinated in rapid rooter can be transplanted into dirt.
October 25, 2018 at 7:48 pm
Do you have to wait for the seed to start sprouting before putting in rapid rooter?
October 25, 2018 at 10:04 pm
It’s not necessary to start the seeds before placing them in the plug.
January 2, 2019 at 9:47 pm
Will the seedling drown if tap root grows down into the water?
January 4, 2019 at 11:42 pm
Rapid rooter plugs provide a good air to water ratio for the plant’s root system, so the seedling won’t drown if the tap root goes down into the water.
January 5, 2019 at 8:54 am
So if i put about a quarter inch of water in the tray to wick up into the rapid rooter it wont get to soggy? And drown the seedling? At what point should i remove the water? Or should i keep water in the tray until ready tp transplant?
January 8, 2019 at 5:58 pm
You’re correct on the amount of water to add and it won’t get too soggy. The rapid rooter plugs will wick up water from the bottom and need to stay moist until seedlings are ready for transplanting.
October 2, 2019 at 4:01 pm
Hi, I am a new grower, and just purchased an AeroGarden Farm XL, which will be arriving tomorrow. I suppose by this time tomorrow, I will have gotten an answer elsewhere, but I need to ask if this step is necessary for the AeroGarden, or can I just germinate the seeds straight from there?
October 2, 2019 at 9:10 pm
Hey Dave! First let me say I’m jealous. The Aerogarden Farm is super cool! You should share some pictures in the forum or on the facebook page once you get your garden going. I’d love to see it!
To answer your question, the Aero gardens use seed pods. Just purchase what seed pods you like, pop them in and you’re ready to go
October 19, 2019 at 6:35 am
Have rapid rooter plugs leftover from a previous grow about one year ago. Despite being in a sealed plastic bag, a small amount of white mildew has formed on the exterior of the plugs. Can these plugs be used, cleaned, or thrown out?
October 19, 2019 at 2:37 pm
Hey Harold! I imagine some airborne spores made it into the bag while it was open at some point. I would recommend throwing them out and starting from know. Seeds and seedlings are already susceptible to damping off, so better safe than sorry.
May 3, 2020 at 11:46 am
I just received my Rapid Rooters. My problem is I do not have a grow tray, what can I use instead? I plan on putting them in my tent as soon as I get them planted and should I use my light?
May 12, 2020 at 6:11 pm
If you have a small tupperware you can place them together so they don’t fall over. Make sure to keep the bottom filled with water.
July 10, 2020 at 10:28 am
How long can you leave your plants in the seed starters before you have to put them In pots?
August 1, 2020 at 11:15 am
Hey Krista! It really depends on your plants, there’s not really a set amount of time. As long as they are getting nutrients they should be ok, the first issue that would arise is spacing.
July 24, 2020 at 12:42 pm
I got RootTech because I’m hoping for better results my second round, w/o buying more autos.
I used these Rapid Rooter plugs the first round, any they were awesomely easy to use. I’ve more.
I found this site today when trying to learn how to use RootTech, and then read this. Could I expect good results using the combo of RootTech + RapidRooter?
August 1, 2020 at 11:22 am
Hey Neil! I’ve had really good results using rootech and rapid rooter.
December 1, 2020 at 11:16 pm
Can you use Quick Rooter to grow microgreens? How would the method change?
December 2, 2020 at 10:12 pm
Hey Michael!
First off, great name! I wouldn’t recommend using rapid rooter for growing microgreens. I don’t have a specific article yet but I would recommend growing fodder similar to growing hydroponic fodder. Not with a grow medium but sprouting the seeds and watering the root mat.
August 20, 2023 at 9:48 pm
Hi Michael,
Thanks so much for all of your articles on getting started with hydroponics – they´re giving me the confidence I need to get started.
If I start seeding in rapid rooter plugs, what´s the process at transplant time? Do I need to remove the soil from the root plugs before transplanting into a medium such as the hydroton clay pellets? Thanks.
October 10, 2023 at 10:59 am
Hey Steve! When transplanting seedlings in rapid rooter you can plant transplant them straight into your hydroponic system. You don’t need to remove any of the rapid rooter material and can plant them directly into your hydroponic clay pebbles.