![]()

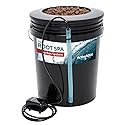
The 5-gallon hydroponic bucket — also known as a bubble bucket — is probably the simplest hydroponic system you can build. It’s easy to maintain, inexpensive, and surprisingly powerful when it comes to growing big, water-loving plants.
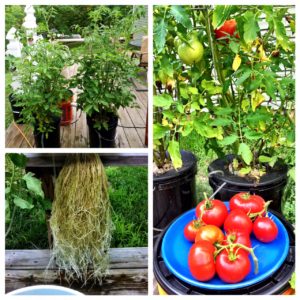
I like to use hydroponic buckets for heavy feeders like tomatoes, cucumbers, pumpkins, and even watermelons. These plants grow huge, and bubble buckets give them the deep roots and oxygen they need to thrive.
Let’s walk through exactly what you’ll need to build one — and how to put it together.

What Is a Bubble Bucket?
A bubble bucket is a type of deep water culture (DWC) system. The plant’s roots are suspended in a nutrient-rich water solution, with constant oxygen delivered via an air pump and air stone so the roots done suffocate. If you have an aquarium, chances are you already own half of what you need to build one.
Why This System Works
The 5-gallon bubble bucket delivers:
- 💰 Low cost: Minimal parts and no fancy tech required
- 🌱 Fast growth: Constant nutrients and oxygen = big roots
- 🧼 Easy maintenance: No timers, fewer moving parts
 | My Top Pick | 1,400+ Reviews |
Supplies Needed To Make A 5-Gallon Hydroponic Bucket |
||
|---|---|---|
| 5-gallon bucket -Use a dark-colored bucket (like black) to block light and prevent algae growth. |  |
View Product |
| Net Pot Bucket Lid– These lids provide a wide, sturdy base compared to using a small net pot alone. |  |
View Product |
| Grow Medium – I use expanded clay pebbles — great drainage, reusable, and reliable. |  |
View Product |
| Aquarium Pump– Go for a strong pump — your root zone will need serious oxygen. |  |
View Product |
| Air Hose – Comes in clear (rigid, great for outdoor) and cloudy (flexible, better indoors). | 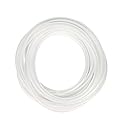 |
View Product |
| Check Valve – Prevents water from flowing back into your air pump when it’s off. | 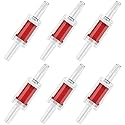 |
View Product |
| Air Stone – Skip the tiny ones. I recommend 6–10 inch air stones that reach more of the root zone. |  |
View Product |
|
🌱 TIP: You can also install a reservoir drain to make nutrient changes easier. |
||
🔨How to Build a 5-Gallon Hydroponic Bucket (Step-by-Step)
Step 1: Assemble the Air System
- Cut a short piece of air hose (about 2–3 inches)
- Connect it to your air pump
- Attach the check valve to the other end
Make sure it’s facing the right direction (look for an arrow on the valve).
Step 2: Connect to the Bucket
- Cut a longer piece of hose to run from the check valve into the bucket
- Keep this as short as possible — long hoses reduce pump efficiency.
I usually keep mine around 5 feet.
Step 3: Prep the Lid + Air Stone
- Connect the hose to your air stone
- You’ve got two options for managing the hose:
- Drill a small hole in the bucket lid to pass the hose through
- Cut a small notch at the rim of the bucket so the lid can sit flat.
This prevents the lid or plant from pinching the hose over time.
Step 4: Add Grow Medium and Plant
- Fill the net pot with hydroton (or your chosen medium)
- If you already have a plant started, place it in the medium
- Add water to the bucket and mix your hydroponic nutrients
🌱 TIP: Make sure the water level just touches the bottom of the net pot — roots will grow down into the oxygenated solution from there.
🚧Maintaining Your Bubble Bucket
Keep the system simple and healthy:
-
Keep the air pump running 24/7
-
Monitor water pH and nutrient levels weekly
-
Add a support cage or trellis if your plant gets heavy
-
Refresh the nutrient solution every 1–2 weeks
⚠️ A Few Tips For Succes:
Support structure: These plants grow large and heavy—use a cage, trellis, or stake for support.
Monitor water temperature: Keep it between 65–70°F to avoid root rot.
Daily checks: Large fruiting plants drink a lot. Check water levels and pH often.
Prune regularly: Especially with indeterminate tomatoes or vining cucumbers.
Not ideal if:
You can’t manage plant support or space constraints (watermelons need lots of room).
Final Thoughts
The DIY 5-gallon hydroponic bucket is one of the easiest ways to start growing hydroponically. It’s budget-friendly, compact, and powerful — perfect for big, thirsty plants.
Just make sure to:
- Provide plant support (they get heavy!)
- Prune and manage growth as needed
- And keep your air pump running 24/7 for strong root health


Thank you for this article
I am searching for a way to use less nutrient solution in my recirculating DWC system.
Each bucket needs around 3.5 gallon before the solution reach the basket.
Multiplied by 6 buckets, that’s making a lot of water and in case of a spill or a leak, a lot of problems !
Any idea about what could be used in the bottom of each bucket to use less water ?
Plants would only need 1.5-2 gallons per bucket to be happy and grow slowly in vegetative state.
Have you tried to use smaller buckets? I’m guessing your using 5 gallon buckets, what about using a 2 or 3.5 gallon bucket?
I saw one person who put a layer of gravel in the bottom. Fish tank gravel would be a good, if somewhat pricey option.
When setting up your 5 gallon bucket system outside, how to you keep the pump set up safe from rain? And do you keep the pump on at all times?
Yes, I keep the pump on at all times. As far as keeping the pump safe from rain, I placed the pump and outlet in a 5 gallon bucket and cut some holes to run the hose and wires.
I am just wondering since I’ve read the instructions well, what is that dark hose sticking out of the bottom of the bucket?
Hey Fred!
On that hydroponic bucket I’ve also added a reservoir drain.
Do you need a filter for this setup or change the water out?
Hey Brett, with this system there is no filter needed.
When do you put callimagic in the solution for the tomato plants to grow better? Do you put in at time of putting them in the 5 gallon bucket or after a number of weeks?
Some people add Calimagic before transitioning to flowering but personally, I start adding 5ml per gallon when shortly after plants start flowering.
Thank you for the note, but the lower leaves were starting to show yellow on the tips. So I added the calimagic of 1 teaspoon per gallon per instructions. You had mentioned to 5ml per gallon. Why the difference?
I go off the feed charts. The general hydroponics feed chart recommends between 2.5ml-5ml depending on phase of growth.
Do you add the liquid bloom 3-12-6 before my tomato plant flowers or after I see the first flowers? I am in the fifth week.
When you start to see buds and you’re ready for flowers to form you switch over to bloom.
Thank for such great information. I’m from Imdia have two small question. After how many days we should change the water?
What is reservoir drain? Please explain.
I would recommend changing the water weekly or bi weekly depending on how much your plant is taking in. A reservoir drain is just a way of easily draining the reservoir so you dont’ have to pick up the heavy bucket or totes to empty it.