![]()

Deep Water Culture (DWC) is one of the simplest and most effective hydroponic systems you can build. It’s affordable, easy to maintain, and works great for leafy greens, herbs, and even some fruiting plants.
In this guide, I’ll walk you through exactly how to build your own DWC system at home, including all the supplies you’ll need, step-by-step instructions, and a few pro tips along the way.
Supplies Needed To Make A DWC Hydroponic System |
||
|---|---|---|
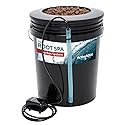
| A Plastic Tote with Lid- Choose a sturdy tote—flimsy plastic can bow from the weight of the water. The black totes with yellow lids are durable and light-resistant, which helps prevent algae.Size depends on how many plants you want to grow. A 7–10 gallon tote is great for 2–4 plants. |  |
View Product |
| 4″ Net Pots– Go with quality net pots that have a lip—cheap ones can fall through the holes. |  |
View Product |
| Expanded Clay Pebbles– Lightweight, pH-neutral, and reusable. These provide plant support while allowing water and oxygen to reach the roots. |  |
View Product |
| Aquarium Air Pump– Oxygen is critical in DWC. Don’t skimp—choose a strong, reliable air pump with enough output to keep bubbles flowing continuously. |  |
View Product |
| Air Hose– There are two main types: Clear (stiffer): good for outdoor setups. Cloudy/flexible: easier to work with indoors. Either works—choose based on your environment. |  |
View Product |
| Check Valve– A small but important part. It prevents water from backflowing into the air pump if the power goes out. |  |
View Product |
| Large Air Stone– The larger, the better—small ones don’t produce enough bubbles. Aim for an air stone that nearly spans the bottom of your reservoir. |  |
View Product |
| 🧰 Tools Needed: Drill, Hole saw (size matches your net pots), Drill bit (same diameter as your air hose) | ||
🛠 How to Build a DWC Hydroponic System

I’m building this version to fit inside a 4×4 grow tent using a 7-gallon tote. I’ll be growing basil and mint, but this setup works for a variety of plants.
🔧 Step 1: Cut Holes in the Tote Lid for Net Pots and Air Hose
What you’re doing: Preparing the lid so your net pots and air hose fit properly.
How to do it (beginner version):
- Place your net pots on the lid to decide how many plants you want and where you’ll place them. Leave space between them so the plants won’t crowd each other.
- Use a marker to trace around each net pot where you want to cut.
- Using a hole saw (the same size as your net pots, in this case 4″), drill the holes.
- Test fit the net pots—they should sit securely in the lid without falling through.
- Now, drill a small hole near the edge of the lid using a regular drill bit (just big enough to fit your air hose). This is where your air hose will pass through.

Beginner note: Don’t worry if it’s not perfect—just make sure everything fits snugly.
💨 Step 2: Assemble the Air System
What you’re doing: Setting up the system that provides oxygen to your plants’ roots.
How to do it:
- Cut a length of air hose long enough to run from the inside of your tote (where the air stone will sit) to the outside where your air pump will be.
- Connect one end of the hose to the air stone.
- Drop the air stone into the bottom of the tote and run the other end of the hose through the small hole in the lid.
- Attach a check valve to the hose—make sure it’s facing the right direction (usually marked with an arrow). This prevents water from flowing back into the pump if power goes out.
- Cut a small piece of hose and use it to connect the other side of the check valve to the air pump.
✅ When powered on, your air pump will send bubbles through the stone to oxygenate the nutrient solution.


Step 3: Fill the Tote and Mix Your Nutrient Solution
What you’re doing: Adding water and nutrients to create the nutrient solution.
How to do it:
- Fill the tote with clean water (filtered or dechlorinated if possible) until it reaches just below the bottom of the net pots—you want the roots to touch the water.
- Note how many gallons you added. This helps with future water changes and nutrient dosing. This is important.
- Add your hydroponic nutrients according to the manufacturer’s instructions (based on total gallons).
- Wait about 10–15 minutes to let the nutrients fully mix.
- Use a pH meter or test kit to check the pH and adjust if necessary (ideal pH range: 5.5–6.5, depending on the plant).
✅ Pro tip: Mark the water level inside the tote so you know where to refill during maintenance.

🌱 Step 4: Add Your Plants
What you’re doing: Placing your seedlings into the system to start growing.
How to do it:
- Place a small amount of clay pebbles in the bottom of each net pot.
- Place your seedling (in rockwool, rapid rooter, or bare-rooted) into the pot so the bottom of the stem is at the top edge of the pot.
- Carefully add more clay pebbles around the seedling to hold it upright.
- Make sure the roots are just touching the nutrient solution through the bottom of the net pot. Add more water to the reservoir if needed.
🌱 Why DWC Is Great for Beginners
Simple setup – no timers or complex plumbing
Low maintenance – just monitor water level, nutrients, and pH
Fast growth – constant oxygen and nutrient access help plants thrive
Budget-friendly – minimal parts, big results
🔁 Optional: Expand Your Setup
Once you’ve mastered one tote, it’s easy to scale up:
Run multiple totes off one air pump
Try different plant varieties side-by-side
Experiment with larger reservoirs and more plants
 | My Top Pick | 1,400+ Reviews |
Final Thoughts
Deep Water Culture is one of the most popular hydroponic methods for a reason—it’s cheap, fast, and beginner-friendly. Whether you’re brand new to hydroponics or adding another system to your grow tent, building a DWC setup is a great place to start!


How far do you keep the water below the net pot? Also, is it good to have a mini float valve (installed onto my RO system) to keep the water at that level in my DWC?
Your website is awesome by the way. It takes a LOT of work to do something like this. The layout of your site and amount of content you have on here is impressive.
Thanks for the feedback Paul, I really appreciate it! It does take a lot of work, but comments like yours make it worth it. I’m happy my love for a hobby can help others!
As to your questions… The water level in DWC systems should be below the base of the plant. In the beginning, the water level is going to be close to the base since the roots are pretty short, so the water will cover the bottom of the net pot. As the roots grow, you can lower the water level an inch or two below the net pot. As long as you aerate the water the roots won’t drown.
The only downside to installing a float valve is that it will dilute your nutrient solution. It’s a good idea to keep it topped off, large plants in DWC suck up a lot of water. Just make sure you do full water changes on a regular basis to keep up the strength of your nutrient solution.
Hi Micheal at the outset let me tell your website and your content is very helpful keep it up.
I am planning for a commercial hydroponic setup growing a mix of leafy vegetables as well as cherry tomatoes zucchini and jalapeños can you give some pointers towards what system nft dwc or growbeds or a mix of them .
The temperature of my location averages around max 32c & min 22c tia.
Thanks for the feedback! For leafy greens, I would recommend NFT systems. For the larger plants, you’ll probably find a drip system is the easiest for large scale growing.