![]()

When I first started hydroponics, I kept my garden out in the open. That worked… until I realized I needed more control over light, temperature, and pests. The solution? A grow tent.
If you’re wondering what goes inside one (besides the tent itself), here’s my complete beginner-friendly checklist—based on one of my own setups—so you can get your grow tent running without guesswork.
1. The Hydroponic Grow Tent
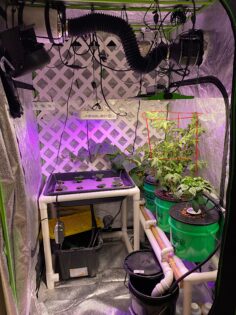
Your grow tent is the backbone of your indoor hydroponic setup. Sizes range from small cubes to walk-in greenhouses.
- My setup: 48″ x 48″ x 80″
- Why tall? Hydroponic systems elevate plants above the ground. A taller tent lets you raise your grow lights as plants grow—great for tomatoes, cucumbers, and other tall crops.
- Clearance tip: Leave 6–12″ above your light for safe hanging and airflow.
Choosing the Right Size (Space Planning)
- 2′×2′ (closet/office): herbs, lettuce, leafy greens; low heat output lights recommended; 60–72″ height works.
- 3′×3′ (spare corner): mixed greens + a couple compact fruiting plants; plan for 72–80″ height.
- 4′×4′ (garage/spare room): multiple systems or larger fruiting plants; 80″+ height gives comfortable headroom.
🌱Pro Tip: Prioritize a thick canvas, sturdy zippers, and a reflective interior to maximize light efficiency and durability. You want it to be easy to get in and out of a lot.
Related 🔗: Review of the Vivosun Hydroponic Grow Tent
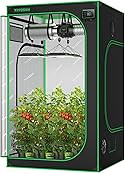 | My Top Pick | 28,500+ Reviews |
2. LED Grow Lights
LED grow lights are the go-to for most home growers because they’re energy-efficient, powerful, and produce less heat than older options.
- Match light coverage to your tent size.
- Use multiple fixtures for even coverage if you’re growing several plants or different heights.
- More usable light (within reason) = more photosynthesis = more growth.
 | My Top Pick | 4,900+ Reviews |
3. Hydroponic System(s)
You can run more than one system in a single tent if space allows.
- DWC System: Simple bucket or tote systems work well.
- Ebb and Flow: I use this for strawberries.
- Drip System: I use this for tomatoes, cucumbers, and peppers.
- NFT System: Compact NFT systems can grow a lot in a small space.
DIY or pre-built both work—just plan for plant spacing, light coverage, and airflow.
Related 🔗: How To Build Different Hydroponic Systems
 | My Top Pick | 1,200+ Reviews |
4. Ventilation System
Don’t skip this. Proper airflow helps with:
- Controlling heat and humidity
- Circulating CO₂ and oxygen
- Reducing mold, mildew, and pests
Basic ventilation setup includes: an inline fan, ducting, and (optional) a carbon filter for odor control. Smart controllers that trigger based on temperature or humidity are a nice upgrade.
 | My Top Pick | 9,600+ Reviews |
5. Rope Hangers
If your lights didn’t come with rope hangers, grab a set. They make height adjustments quick and painless as plants grow.
6. Power Strip
You’ll be plugging in lights, fans, pumps, and timers—so a reliable power strip is a must. Bonus points for models with app control and built-in scheduling.
🌱Pro Tip: Label each plug (light, fan, pump) so troubleshooting is easier later.
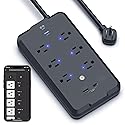 | My Top Pick | 500+ Reviews |
7. Fans
Plants need gentle air movement indoors. A small clip-on or floor fan helps:
- Strengthen stems
- Lower pest and mold risk
- Keep temperature more consistent
8. Timers
Use timers to automate:
- Light cycles (common veg schedule: 16 hours on / 8 hours off)
- Pump operation for ebb & flow or drip systems
Analog push-pin timers are simple, cheap, and reliable—perfect for a first setup.
9. Velcro Straps (Optional but Handy)
Use reusable Velcro straps to tidy cords, secure ducting, and keep your space functional.
What Does A Hydroponic Grow Tent Setup Cost? (Ranges)
Realistic ballpark ranges for a small home beginner setup. Prices vary by brand/quality; these are estimates to help you plan:
| Component | Budget Range (USD) | Notes |
|---|---|---|
| Grow Tent (2×2 to 4×4) | $90–$200 | Thicker canvas & better zippers cost more. |
| LED Grow Light(s) | $100–$300 | Match footprint to tent; dimming is a plus. |
| Inline Fan + Ducting | $60–$150 | Controller adds convenience. |
| Carbon Filter (optional) | $40–$100 | For odor control if needed. |
| Clip/Clamp Fan(s) | $15–$35 each | One per 2–4 sq ft is common. |
| Rope Hangers | $10–$20 | Two pairs cover most setups. |
| Timers | $10–$25 | Analog or app‑based. |
| Power Strip (surge) | $25–$50 | Look for spaced outlets. |
| Hydroponic System | $20–$250 | System price ranges from DIY to store-bought |
| Total | $370- $1,130 | Estimated Range |
Final Thoughts
With a little planning and the right components, building a hydroponic grow tent is easier than you think. Invest in quality lights, airflow, and timers to reduce headaches later.
Have a piece of gear you can’t live without? Drop it in the comments—I’m always looking for upgrades.


